
To light your face properly for meetings and tutorials, position soft, diffuse lights slightly above and in front of you to avoid shadows and highlight your features evenly. Use natural light when possible, or opt for adjustable LED panels with a warm or neutral tone. Keep the lighting consistent and avoid harsh glare or unflattering angles. If you’re interested in mastering these tips, you’ll find simple steps that will make your video look more professional and confident.
Key Takeaways
- Face the light source, ideally natural or diffused artificial light, placed slightly above and in front for even, flattering illumination.
- Use soft, adjustable LED lights or ring lights to minimize shadows and create a natural glow.
- Set the color temperature around 5500K for daylight-like warmth and consistent appearance.
- Position lights at eye level and avoid overhead or side-only lighting to prevent unflattering shadows.
- Regularly preview your camera feed and adjust brightness and angle for optimal, confident presentation.
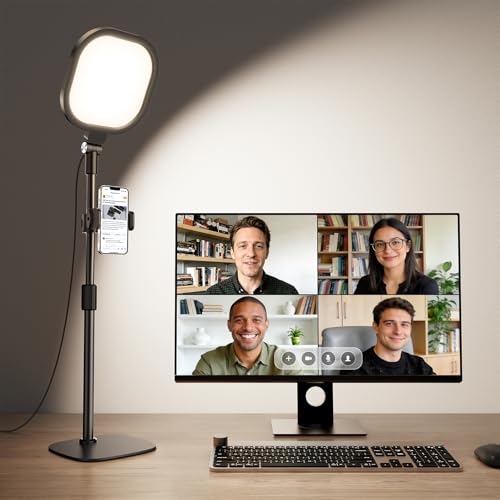
Zoom Lighting for Computer, Adjustable Desk Lighting for Video Calls, 30 Light Modes Video Conference Light, Desk Ring Light with Stand for Webcam, Meetings, Live Stream, Home Office. CRI 97.8
Uniform and Soft Illumination: LitONES desk video conference light utilizes advanced edge-lit technology, delivering even and gentle lighting…
As an affiliate, we earn on qualifying purchases.
As an affiliate, we earn on qualifying purchases.
Why Good Lighting Boosts Your Video Meeting Confidence
Good lighting can considerably boost your confidence during video meetings because it makes your face look clear and approachable. When your face is well-lit, your facial expressions become more visible, helping others read your emotions accurately. This enhanced visibility encourages you to speak more confidently and engage actively. Proper lighting also enhances your voice modulation, making your speech sound more natural and dynamic. When you’re visible and well-lit, you’re less likely to feel self-conscious, which reduces nervousness. Additionally, incorporating outdoor lighting techniques can create a more natural and flattering glow, further improving your appearance on camera. Using the right gear and dress codes can also help optimize your lighting setup and presentation. As a result, your communication improves, and you appear more professional and trustworthy. Good lighting creates a positive feedback loop: it helps you express yourself better and feel more confident, ultimately making your video meetings more effective and less stressful. Proper lighting placement also plays a crucial role in achieving the best results. Ensuring your lighting setup is optimized can significantly impact how confident and prepared you appear on camera. Incorporating lighting knowledge into your setup can help you make smarter adjustments and improve your overall presence.

Torjim Softbox Photography Lighting Kit, 16'' x 16'' Professional Softbox Lighting Kit with 85W 3000-7500K LED Bulbs, Studio Lights for Photography/Video Recording/Live Streaming/Portraits Shooting
【Illuminate Your Creativity】 Torjim softbox lighting kit is made of high-quality PET fabric and a foldable nylon cover,…
As an affiliate, we earn on qualifying purchases.
As an affiliate, we earn on qualifying purchases.
Choosing the Right Lighting for Your Face

When choosing lighting for your face, consider whether natural light or artificial sources work best for you. If you opt for artificial lights, explore different types like softboxes or ring lights to find what fits your setup. Pay attention to light positioning—placing lights slightly above and facing you helps create a natural, flattering look. Using color temperature adjustments can also enhance the overall appearance and ensure your face is lit accurately. Additionally, being aware of portable oil radiators and their safety tips can help you maintain a comfortable environment while setting up your lighting. Incorporating the right lighting techniques can further improve how your face appears on camera, making your meetings and tutorials more professional. Understanding battery inverter generators and their capacity can ensure you have reliable power for your lighting equipment during remote sessions. Considering home architecture details such as room layout and natural light sources can also significantly impact your lighting setup.
Natural Light Preferences
Natural light is often the most flattering and easiest to work with when lighting your face for meetings or tutorials. It provides a soft, natural glow that reduces shadows and highlights your features. Sunlit mornings are ideal, offering warm, even lighting without harsh contrasts. If you prefer outdoor settings, choose shaded areas to avoid direct sunlight, which can cause glare or overexposure. Timing your recordings or calls during golden hours—early morning or late afternoon—can improve your appearance. Keep these tips in mind:
- Seek diffuse, indirect sunlight in outdoor settings
- Avoid harsh midday sun to prevent glare and shadows
- Position yourself facing the light source for even illumination
- Use natural reflections from nearby surfaces to enhance your face’s brightness
- Be mindful of cabling solutions to ensure your setup remains professional and clutter-free
Additionally, understanding the importance of natural light preferences can help you optimize your lighting conditions for a more polished look. Recognizing the significance of lighting angles can further enhance your overall appearance on camera. Properly filter sizing/flow can also improve the quality of your lighting environment by reducing glare and unwanted reflections. Incorporating the right lighting accessories can further refine your setup and ensure consistent lighting quality throughout your recordings or calls.
This approach guarantees a natural, professional look in your meetings and tutorials.
Artificial Light Types
Are you unsure which artificial lighting will best illuminate your face during meetings or tutorials? LED lights are a popular choice because they’re versatile and energy-efficient. When selecting LED lights, pay attention to color temperature, measured in Kelvins. For a natural, balanced look, choose a temperature around 5000K to 6500K, which mimics daylight. If you want a warmer, more inviting glow, opt for lower Kelvin values like 2700K to 3000K. Adjusting the color temperature helps you achieve the right mood and clarity, ensuring your face is well-lit without harsh shadows or unnatural tones. Consider LED panels or ring lights—they offer adjustable settings, making it easier to match the lighting to your environment and preferences.
Light Positioning Tips
Positioning your lights correctly can make a significant difference in how your face appears on camera. To achieve flattering, even lighting, consider your light placement carefully. Use lighting accessories like diffusers or reflectors to soften shadows and create a natural look. For creative lighting, experiment with angles—placing lights slightly above and facing your face minimizes unflattering shadows. Avoid placing lights directly behind you, which can cause glare. Keep your key light at eye level for balanced illumination. Additionally, incorporate fill lights or side lights to add depth and reduce harsh contrasts. Remember, the goal is to highlight your features without overexposing or creating distracting shadows. Proper light positioning guarantees you’re well-lit and camera-ready for meetings and tutorials.

ALTSON 60 LED Portable Selfie Light Video Conference Lighting with Clip & Camera Tripod Adapter Rechargeable 2200mAh CRI 97+, 3 Light Modes for Phone iPhone Webcam Laptop Photo Makeup
【Best Light Effect CRI 97+】This slim and lightweight LED light will brighten up your beauty in front of…
As an affiliate, we earn on qualifying purchases.
As an affiliate, we earn on qualifying purchases.
Positioning Lights for Flattering, Even Illumination

To achieve flattering, even illumination, you need to carefully position your lights so they highlight your face without creating harsh facial shadows or uneven brightness. Aim for light sources that provide soft, diffused light to enhance your features and minimize unflattering shadows. Proper positioning involves placing lights at eye level and slightly in front of you, angled to evenly illuminate your face. Using light diffusion tools like softboxes or umbrellas helps spread light smoothly across your face. Think of it as creating a gentle glow that flatters your features rather than harsh highlights. Good lighting can also help highlight your natural skin biology, making your appearance more vibrant on camera. Additionally, understanding color matching can further improve how your overall look appears on screen and in person. Being aware of the lighting setup can help you make better adjustments to achieve the desired effect. Here’s a visual to guide you:
| Light Position | Effect | Tips |
|---|---|---|
| Slightly above eye level | Reduces facial shadows | Use diffusers for softness |
| Front-facing | Even illumination | Avoid direct, harsh beams |
| Slightly to the side | Adds dimension | Keep light diffuse |
This setup ensures your face is evenly lit and flattering.

NEEWER 9" LED Video Light Panel, Dimmable DSLR Camera Soft Lighting with Mini Desk Tripod Stand, USB Type C Ports, 3200K~5600K CRI95+ for Studio Photography Video Recording Live Streaming, NL-116AI
【Versatile LED Video Light Panel Kit】 The 9" LED video key light features 58 warm and 58 cool…
As an affiliate, we earn on qualifying purchases.
As an affiliate, we earn on qualifying purchases.
Common Lighting Mistakes to Avoid

Avoid harsh shadows and glare by placing your lights at the right angles, so your face looks clear and balanced. Poor light placement can cause unflattering shadows or uneven illumination that distracts from your message. Pay attention to how your lighting setup affects your appearance to keep your face well-lit and professional. Using proper lighting techniques can also help reduce the need for extensive post-processing or adjustments. Incorporating knowledge about Support Breakfast and other pet care tips can remind you to keep your environment comfortable and stress-free during virtual meetings. Additionally, understanding the significance of time management can help you schedule your lighting setup to ensure optimal visibility during important tutorials. Recognizing regional flavor profiles in your environment can also inspire you to create a more inviting and engaging space for virtual interactions.
Harsh Shadows and Glare
Harsh shadows and glare can ruin the quality of your video or photo, making your face look uneven or unflattering. To avoid this, focus on glare control and soften harsh shadows. Bright, direct light often creates unflattering contrast, so use diffusers or bounce surfaces to spread light evenly. Position your light source at a flattering angle—preferably slightly above and in front of you—to minimize shadows. Also, consider the background and environment to prevent unwanted glare or reflections. Incorporating lighting techniques can further enhance your setup for more professional results.
Poor Light Placement
Have you ever noticed how poorly placed lights can make your face look uneven or washed out? It’s a common mistake in room setup that can ruin your video quality. Using the wrong lighting equipment or positioning lights at the wrong angles creates unflattering shadows or harsh highlights. To avoid this, place your light source at eye level and slightly in front of you. Don’t rely solely on overhead or side lighting, which can distort your features. Instead, use a soft, diffuse light to evenly illuminate your face. Adjust your room setup by removing clutter and ensuring the light isn’t blocked or reflected. Proper light placement is key to a professional, balanced look during meetings and tutorials. Additionally, considering your mental health and mood can help you create a more comfortable and effective workspace.
Adjusting Brightness and Color for a Natural Look

To achieve a natural look on camera, adjusting your brightness and color settings is essential. Properly managing color temperature helps match your lighting to your environment, avoiding overly warm or cool tones that distort your appearance. Light diffusion softens shadows and reduces glare, creating a more flattering, even glow.
Consider these tips:
- Set your color temperature to around 5500K for daylight-like warmth.
- Use diffusers or softboxes to evenly spread light and minimize harsh shadows.
- Adjust brightness so your face is well-lit without washing out details.
- Check your camera preview regularly to fine-tune the balance between brightness and color for a natural, appealing look.
Keeping Your Lighting Consistent Across Settings

Once you’ve fine-tuned your lighting to look natural in one setting, maintaining that consistency across different environments becomes key. To do this, pay attention to the lighting color, ensuring it stays the same even when you move between rooms or devices. Use light sources with good durability so your lighting remains steady over time, avoiding flickering or color shifts. Keep a portable light source or extra bulbs on hand to replicate your original setup if needed. Consistent lighting color prevents your face from appearing different in various settings, which can be distracting. Regularly check your lighting to confirm it matches your preferred tone, and avoid switching between light sources with different color temperatures. This consistency helps you look professional and polished in all your meetings and tutorials.
Frequently Asked Questions
What Types of Lighting Equipment Are Best for Small Spaces?
For small spaces, you should opt for compact lighting equipment like ring lights and LED panels. Ring lights are perfect because they produce even, soft light directly on your face, reducing shadows. LED panels are versatile and adjustable, allowing you to control brightness and warmth. Both are space-efficient, easy to set up, and deliver professional-looking results, making them ideal choices for tight environments where quality lighting matters.
How Do I Prevent Shadows on My Face During Calls?
Think of yourself as a painter, aiming for a flawless portrait. To prevent shadows during calls, use diffuse lighting that evenly softens your face, much like gentle sunlight on a cloudy day. Position your lights in front and slightly above, ensuring they eliminate shadows, creating a balanced glow. Avoid harsh direct lights, and consider a ring light or softbox to achieve shadow elimination, so your face looks clear and professional on camera.
Can Natural Light Be Sufficient for Professional Video Meetings?
Yes, natural light can be sufficient for professional video meetings if you position yourself facing a window, allowing soft, even indoor lighting. Make sure the light isn’t too harsh or direct, which can cause shadows or glare. If natural light isn’t consistent, supplement with indoor lighting like a lamp or ring light. Combining natural light with well-placed indoor lighting creates a balanced, professional look for your video calls.
How Often Should I Adjust My Lighting Setup?
You should adjust your lighting setup whenever you notice changes in your environment or if your face appears uneven or too shadowed. Maintaining lighting consistency is key, so check your setup regularly—ideally once every few meetings or tutorials. Frequent adjustments help verify your face is well-lit and professional-looking, especially if natural light fluctuates or if you move around during your session.
What Are Quick Fixes for Poor Lighting in a Hurry?
Imagine your face as a canvas needing quick brightness. For instant fixes, adjust color temperature to warmer tones or use a white cloth to diffuse harsh light. If your face appears too shadowed, position a nearby lamp to fill in, ensuring even light. These simple steps, like diffusing paint, instantly soften and brighten your face, improving your appearance in a hurry without complex equipment.
Conclusion
Good lighting is your secret weapon, like a spotlight that makes you shine in every meeting. By choosing the right lights, positioning them well, and tweaking brightness and color, you’ll look confident and approachable. Keep things consistent across different setups to maintain that polished vibe. Remember, lighting isn’t just functional—it’s your stage. When you light your face properly, you’ll feel as radiant as a star, ready to impress in every tutorial or meeting.